CrunchLabs IR Turret: Build, Code, and Fire
Can a foam-dart turret teach you embedded programming? The CrunchLabs Hack Pack says yes. This hands-on project introduces IR sensors, servo motors, and tidy Arduino code.


In 2022, CrunchLabs launched the Build Box subscription to bring engineering into households through hands-on projects. Each monthly kit was designed to help kids understand how machines work by building them piece by piece. The goal was clear: make engineering feel creative, approachable, and rooted in problem-solving, not just math on a whiteboard.
The kits were fun and well executed. However, they left one question unanswered. What about the older kids, the teens, or the adults who enjoy tinkering with code and electronics?

In 2024, CrunchLabs introduced the Hack Pack, a new kind of kit aimed at more experienced builders. Each project combines mechanical design, basic electronics, and embedded programming into a guided build that teaches practical skills in a fun and creative way.
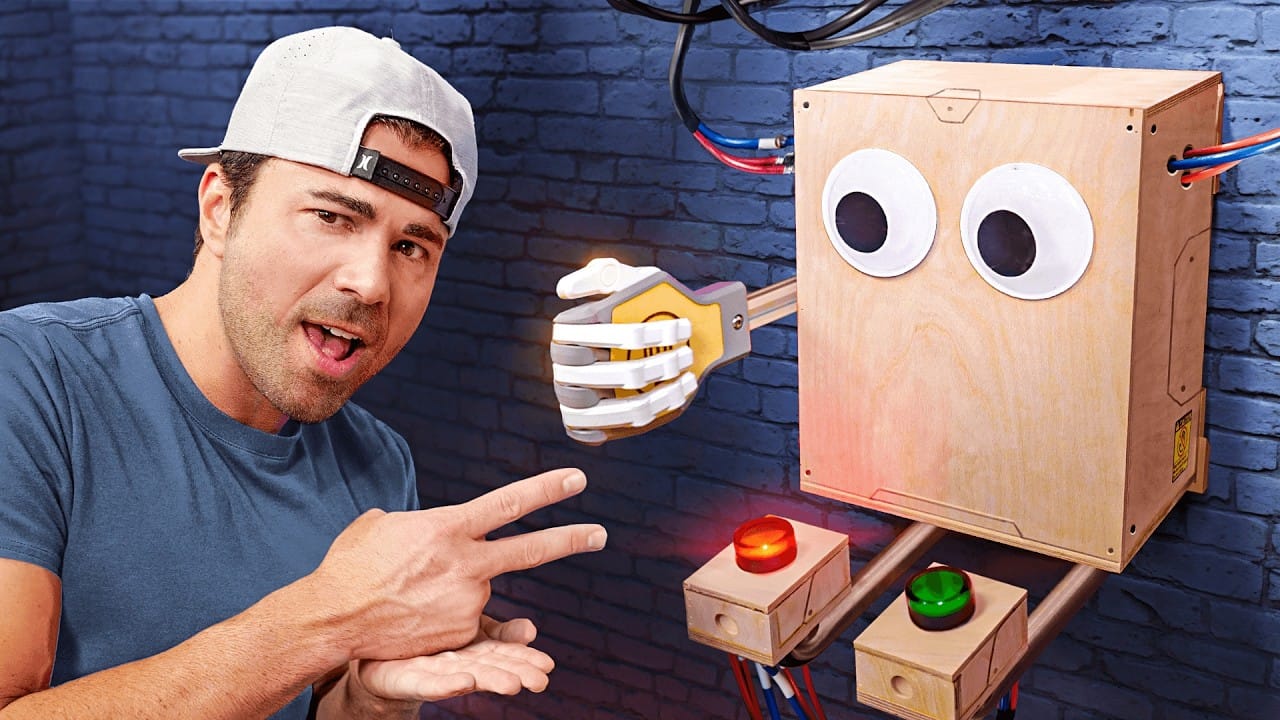
This article explores the journey of building the first Hack Pack project: the IR turret. Controlled by an infrared remote and powered by three servos, the turret can rotate, tilt, and fire foam darts at its target. It introduces important concepts in Arduino programming, signal decoding, and motion control. Along the way, we will examine the mission that inspired it, the components that make it work, and the valuable learning opportunities this playful project provides.
The CrunchLabs Mission
Mark Rober is best known for his YouTube channel. He uses science, engineering, and creative problem-solving to explain how things work. He spent nine years at NASA, where he contributed to the Mars Curiosity Rover. After that, he worked at Apple as a product designer. His videos include glitter bomb traps, squirrel obstacle courses, domino machines, and egg drop challenges. These projects have inspired millions of viewers to ask questions, build things, and explore the world with curiosity.
As the audience grew, Mark Rober founded CrunchLabs. He needed a small team of engineers to scale up his goals of encouraging kids to think like engineers. Its first major product was the Build Box Subscription, a monthly kit that helps children learn how engineers think. Each box includes a project, such as a disc launcher or marble sorter, that focuses on mechanical principal. A private video accompanies the build and explains the key concepts behind it. The kits focus on hands-on experimentation. Builders are encouraged to test ideas, learn from mistakes, and improve their designs.
As the community grew older, there was a clear need for something more advanced. Teenagers, educators, and adult hobbyists yearned for kits that explored concepts, such as electronics coding, and advanced mechanical designs. Thus, CrunchLabs created the Hack Pack.

These kits, recommended for ages 14+, blend mechanical design, embedded programming, and basic electronics. These kits are priced accordingly, with each box costing around $80 USD and a three-box minimum at purchase. This reflects the quality of components and the ambition of the builds, though it places the kits closer to hobbyist-level pricing than entry-level toys.
The IR turret, one of the first Hack Pack projects, offers a fun and practical challenge. It uses three servos and an infrared receiver to control a dart-firing turret with a standard remote. Builders work with Arduino code, manage signal input, and control physical movement. The experience teaches real skills while encouraging experimentation.
Inside the Kit
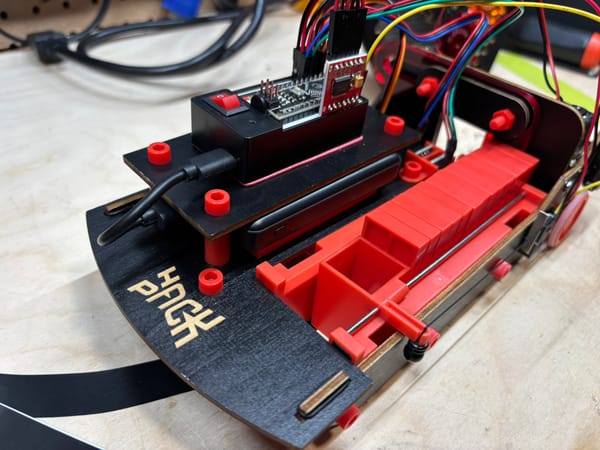
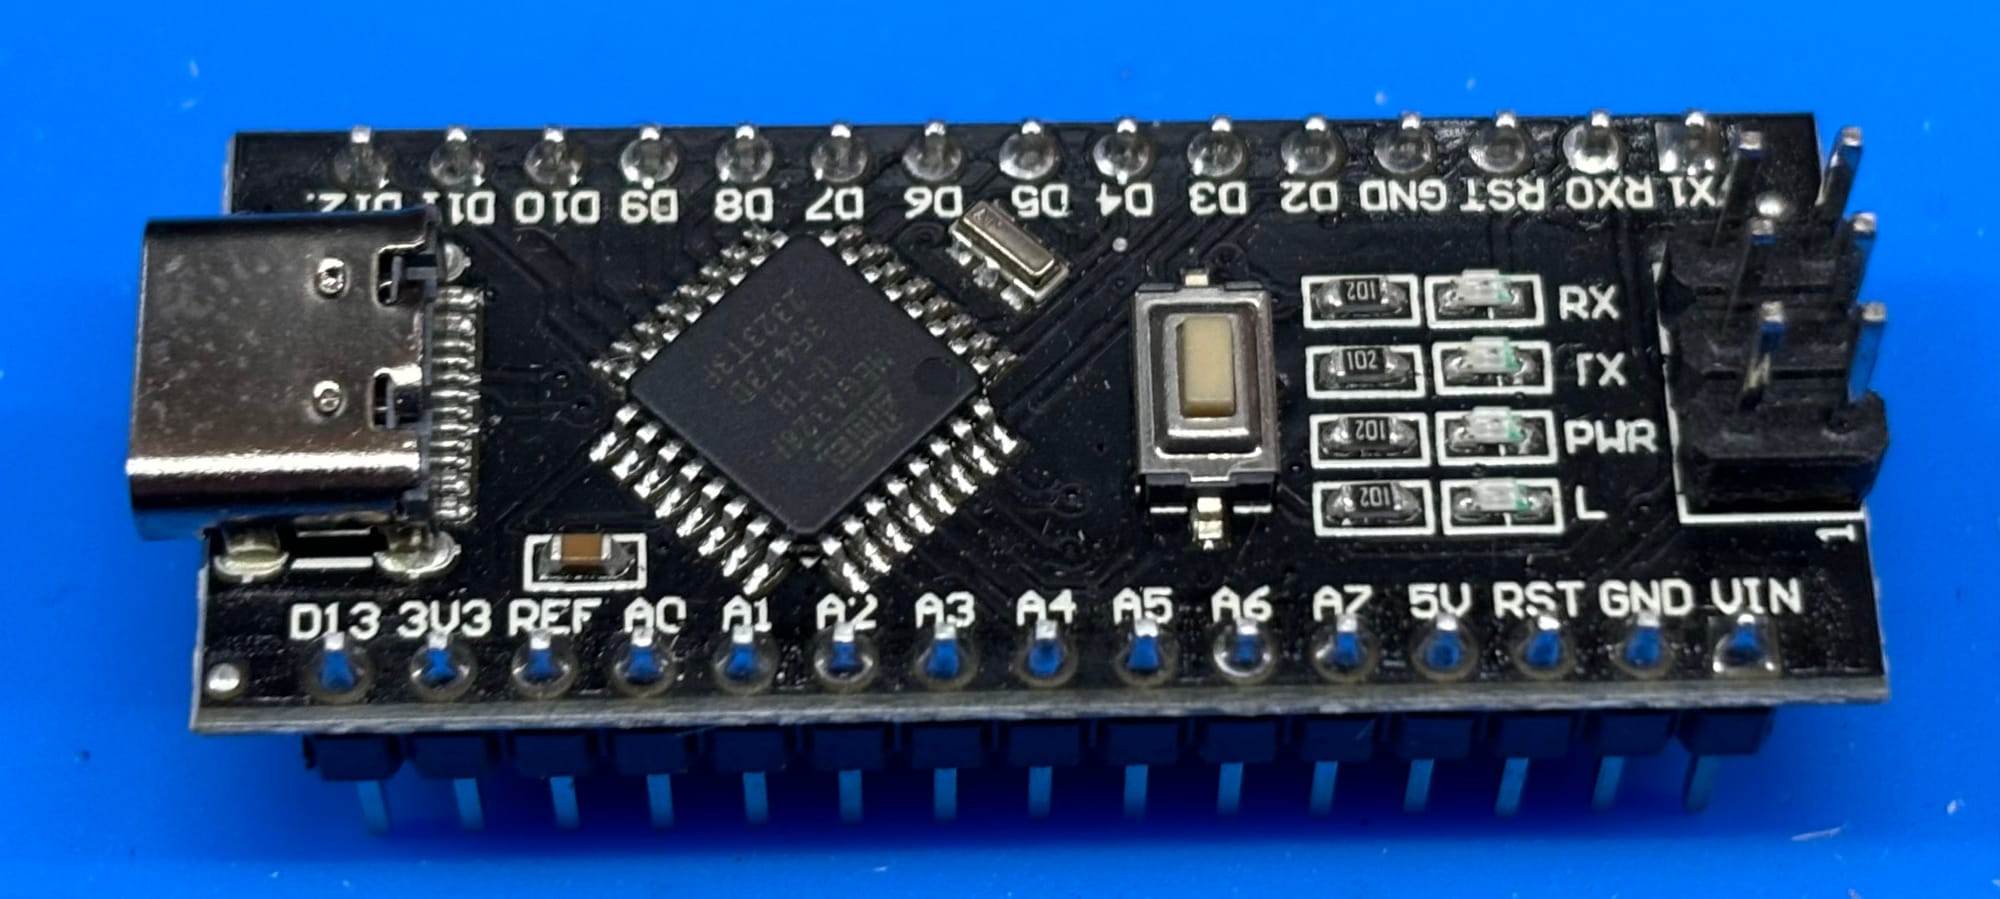
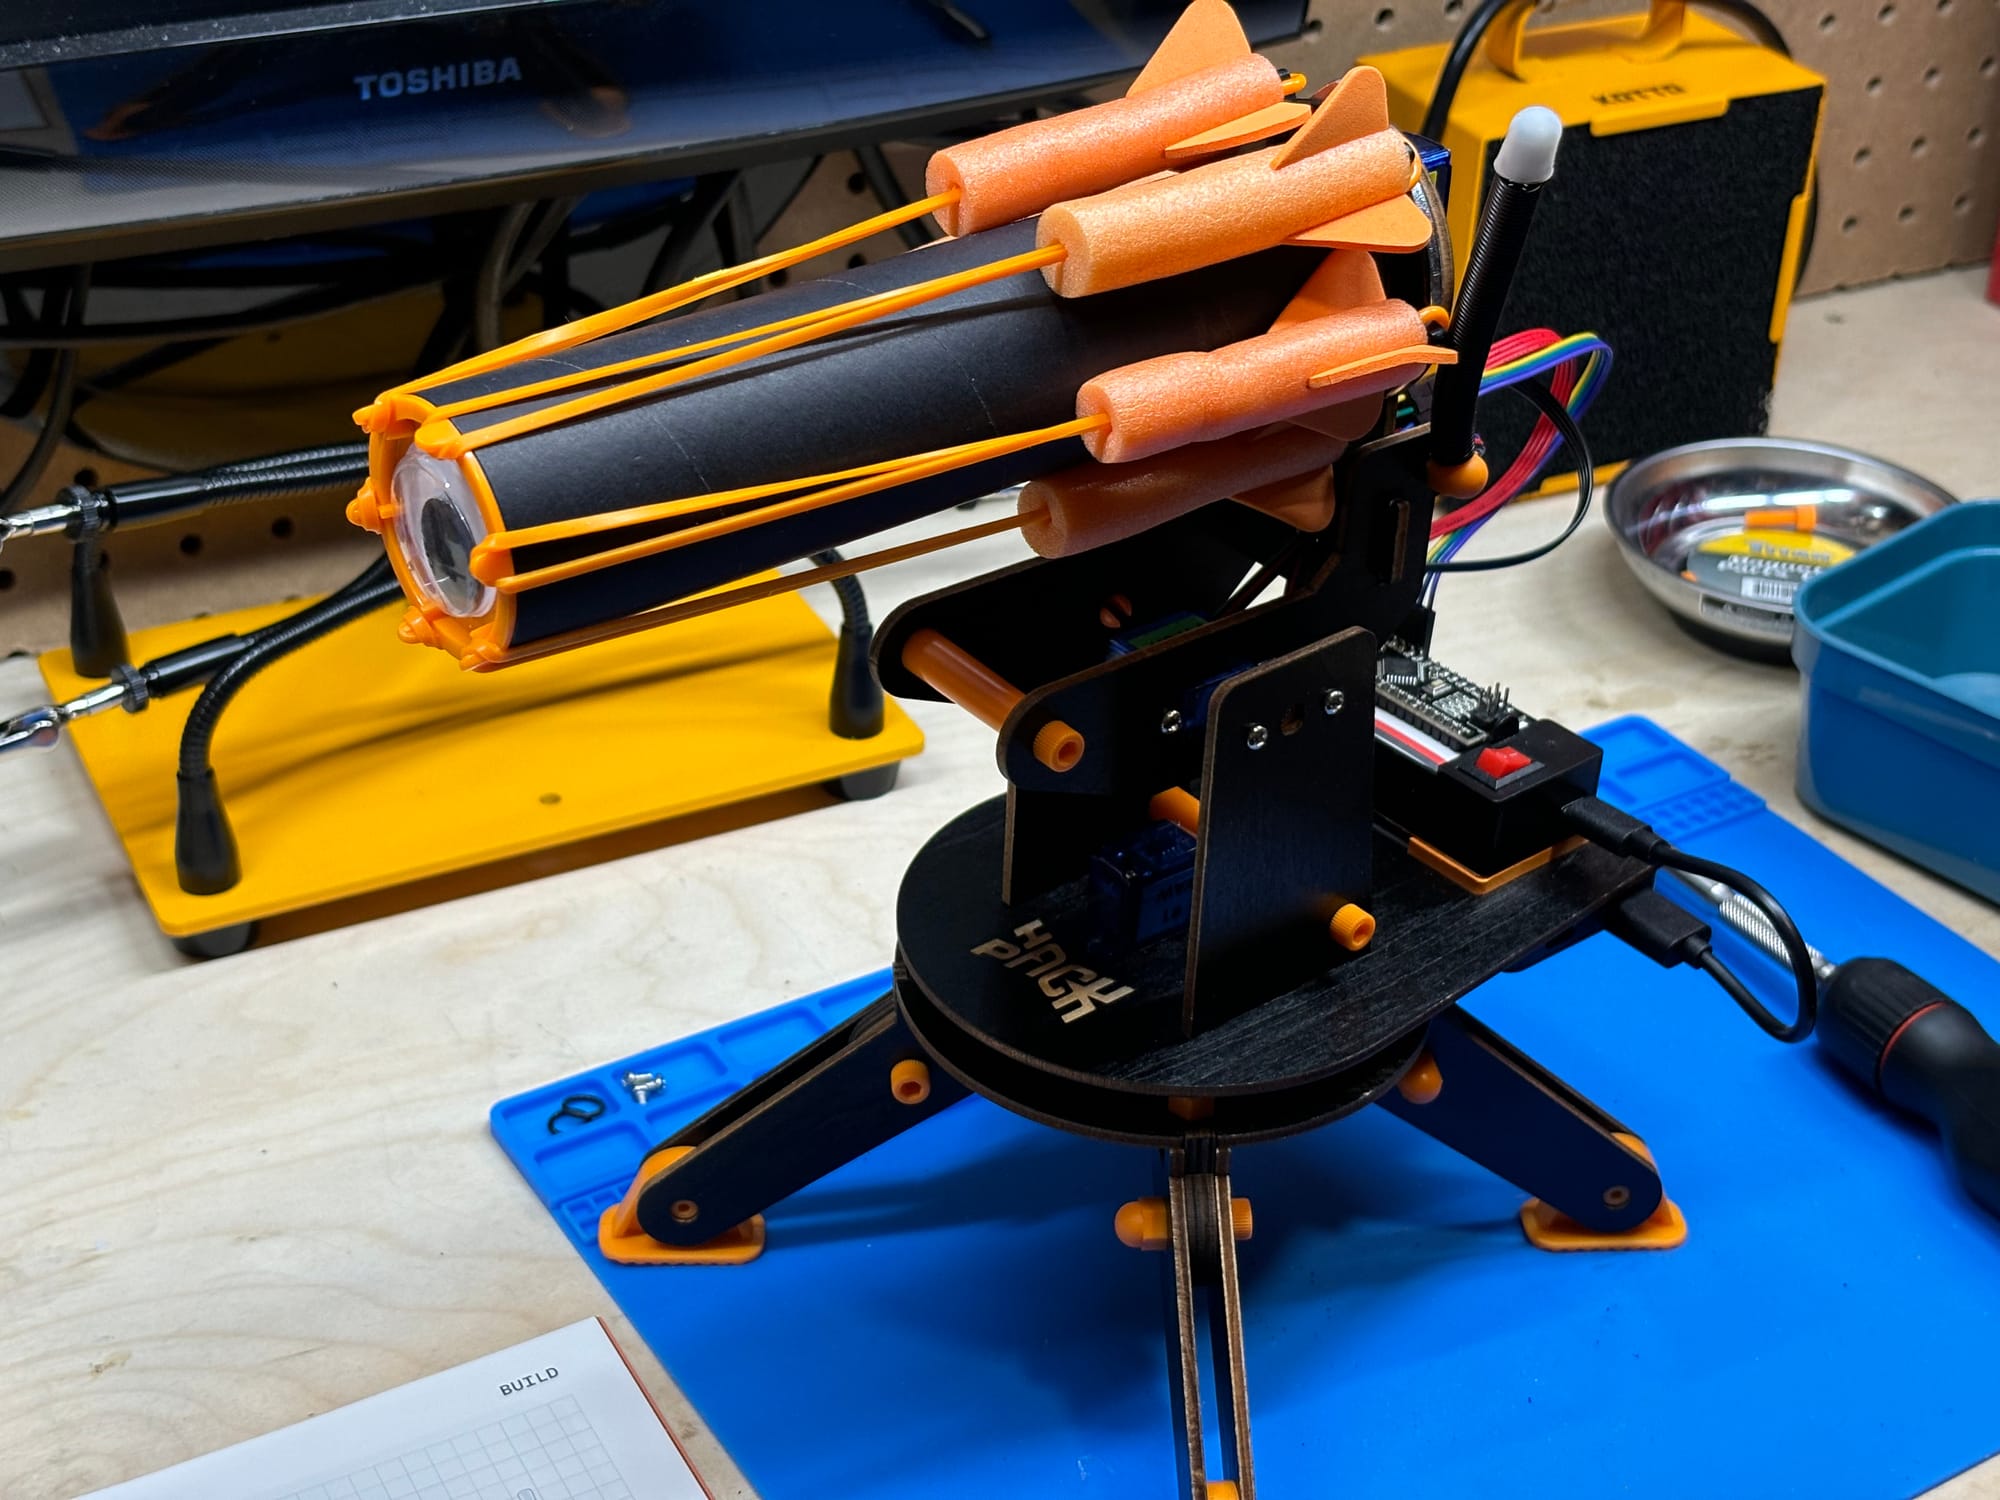
The IR turret is one of the signature builds in the Hack Pack lineup. At its core, the project is a foam-dart launcher mounted on a motorized base. The turret, controlled by a Arduino nano-compatible board, turns left and right, aims up and down, and fires foam darts on command from a small infrared remote. The build introduces key ideas in mechanical movement, remote input handling, and servo control. The kit includes everything needed to build and operate the turret, including a USB battery pack. This allows the final build to operate untethered, without requiring a constant connection to a computer or wall outlet.
Understanding servos is the main learning objective of this kit. A servo motor is a compact motor designed to move with precision. In robotics and embedded systems, servos are often used to control motion in a defined direction or to hold a position. Most entry-level servos fall into two categories: positional and continuous rotation.
A positional servo moves to a specific angle when given a signal, usually between 0 and 180 degrees. In this turret, the positional servo is responsible for aiming the barrel up and down. When you press the "up" or "down" button on the remote, the Arduino sends a signal that adjusts the servo angle, changing the turret’s vertical aim.
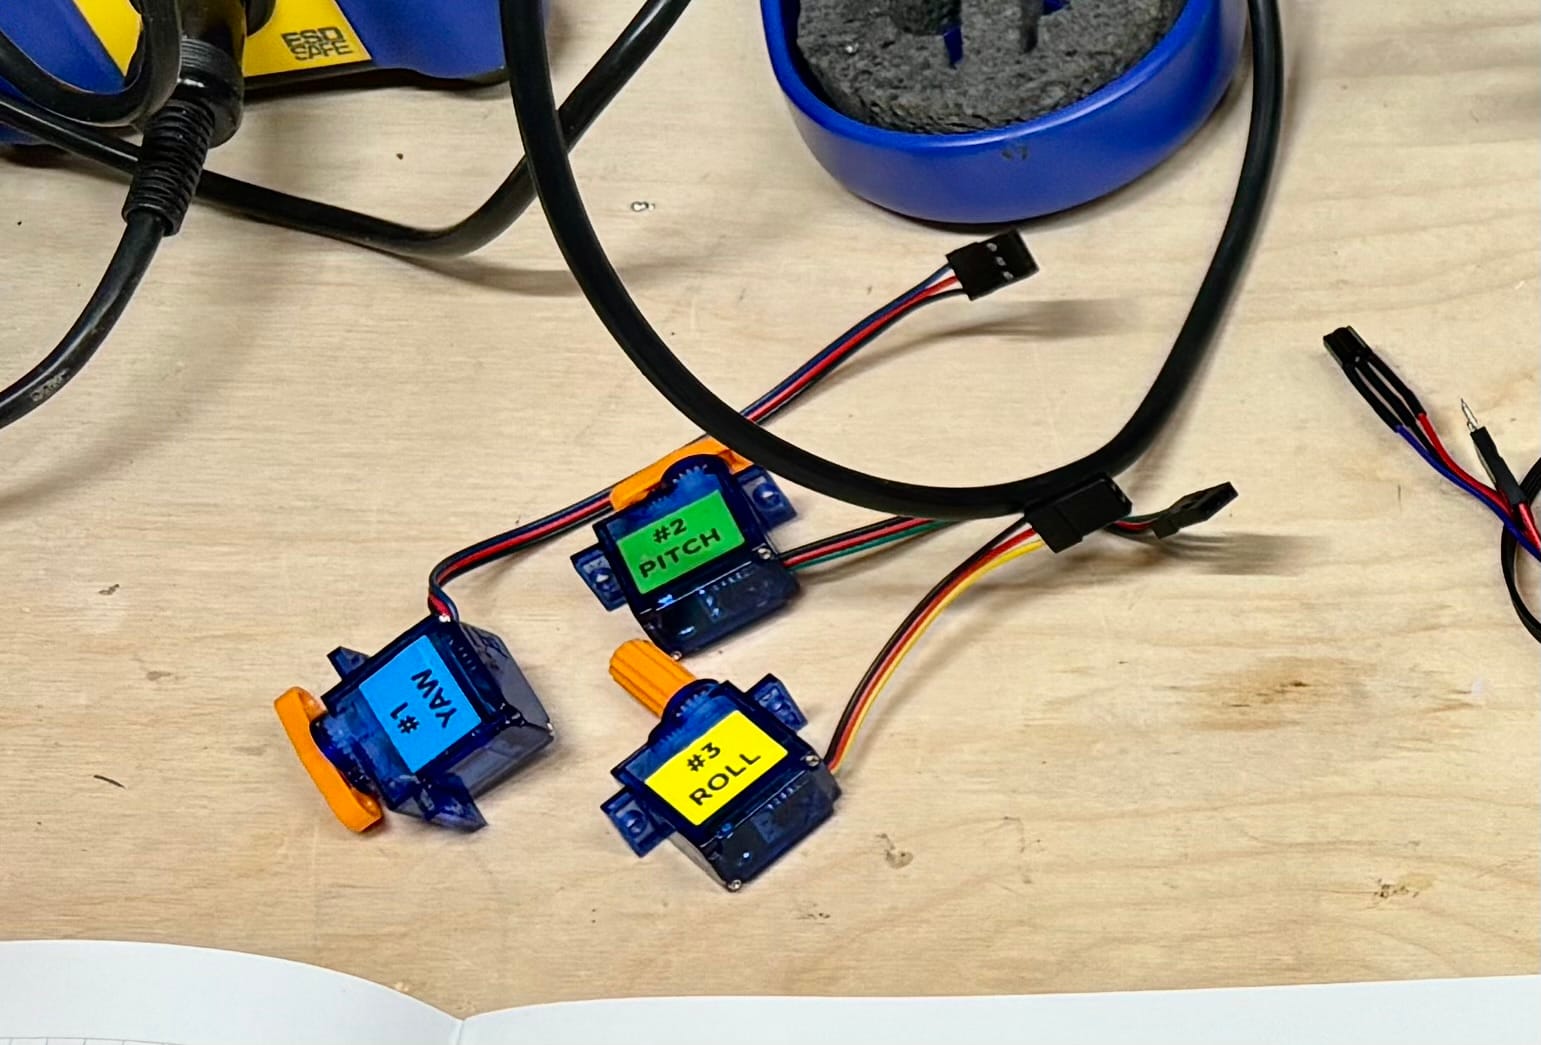
A continuous rotation servo, by contrast, behaves more like a regular motor. Instead of turning to a specific angle, it spins forward or backward at varying speeds depending on the input value. This project uses two of them. One controls the turret’s left-right rotation. The other pulls back and releases the firing mechanism to launch a foam dart.
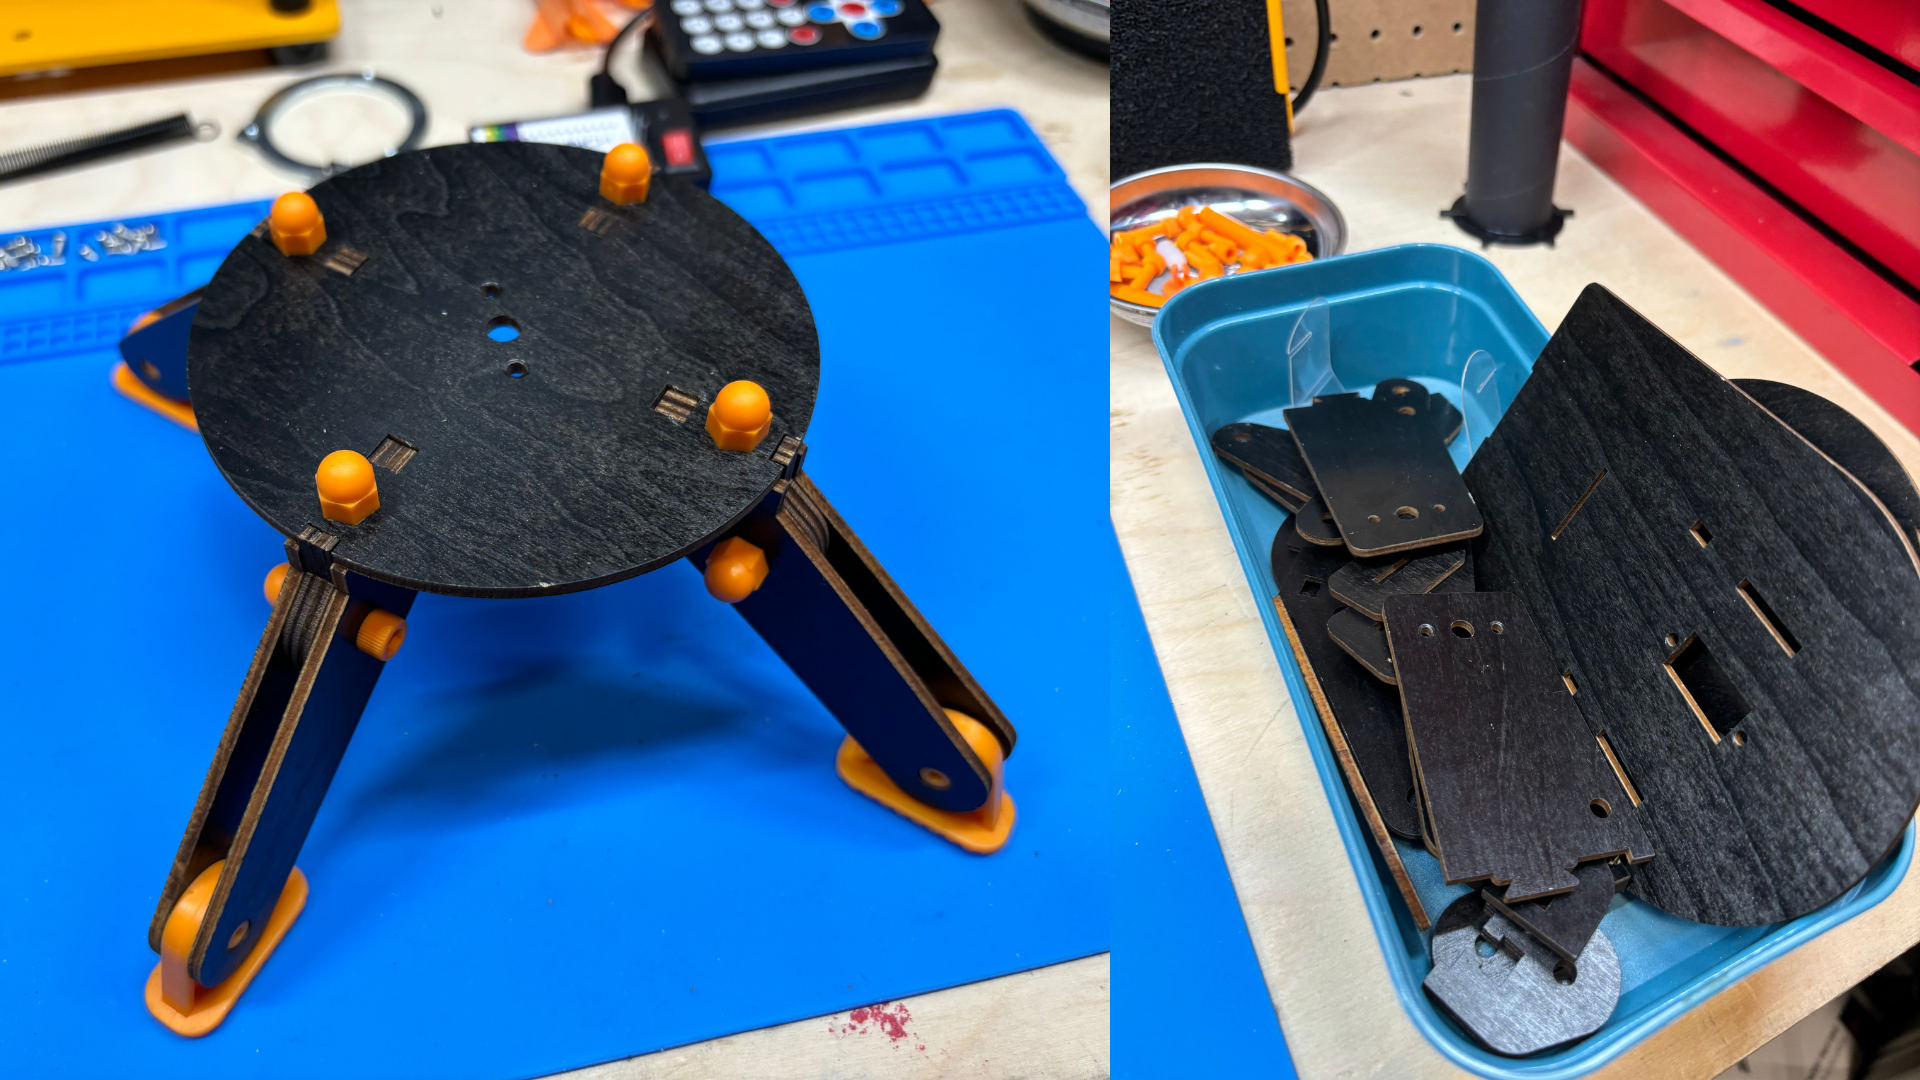
The kit includes a lightweight wooden frame that supports the turret’s movement. Plastic parts are used for components that need to snap together, such as bolts, brackets, and the feet of the base. The Arduino-compatible control board mounts cleanly into a slotted holder. A small color-coded breadboard provides connections for power and signal.
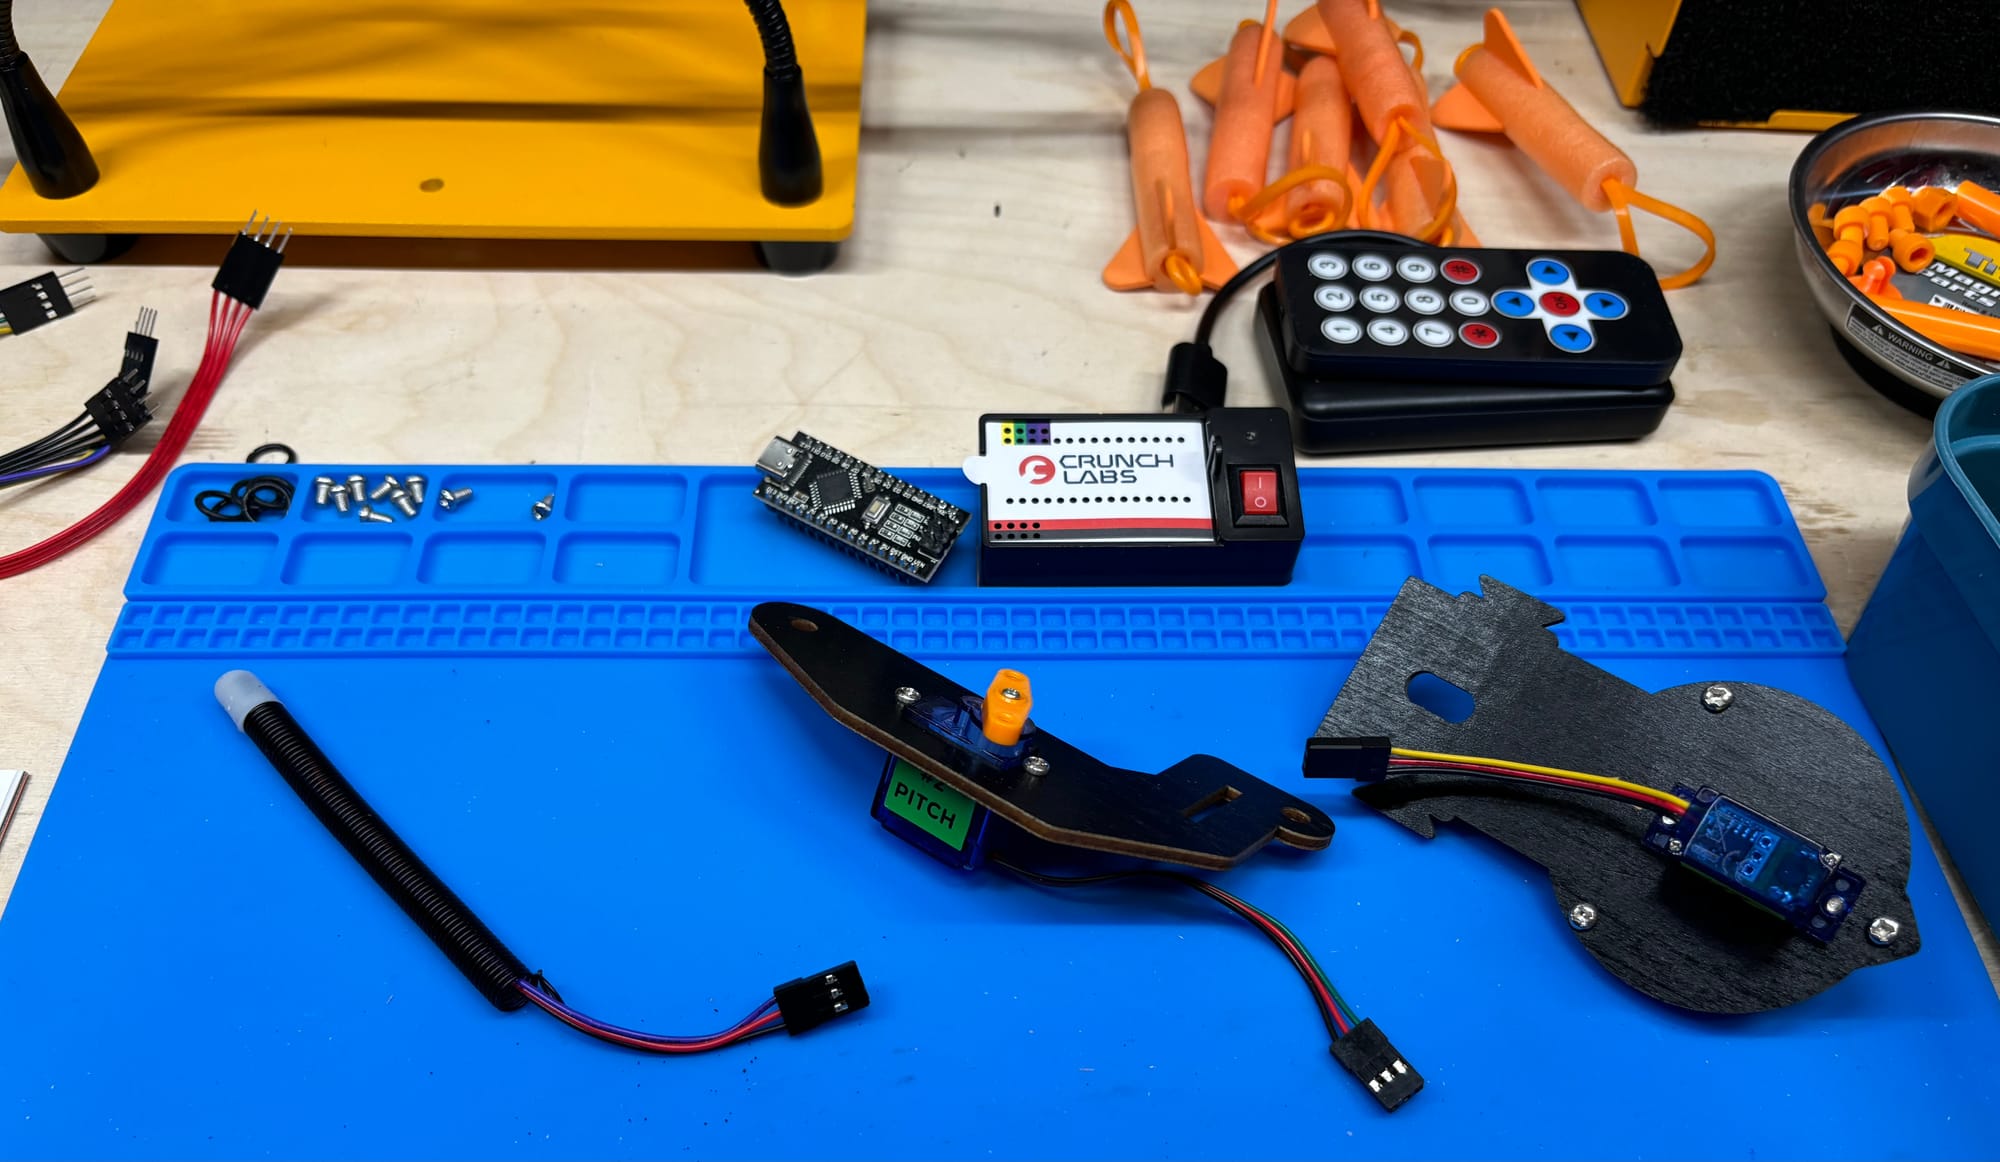
An IR receiver connects directly to the board and listens for simple directional commands from the included remote. It detects these signals by reading patterns of invisible infrared light. Each button on the remote sends a unique pulse code, which the receiver translates into a number. That number is passed to the Arduino, which then triggers the appropriate action, such as rotating the base or firing a dart. The receiver connects to a single digital input pin and relies on a software library to decode incoming signals. While the component is small, it plays a critical role in turning user input into turret movement.
Some Assembly Required
The IR turret comes together through a series of clearly defined steps that combine wood, plastic, and electronics into a functional blaster. The main body is built from pre-cut wooden parts that form the rotating frame. These pieces lock together without glue or soldering. Plastic components, such as axles, brackets, and acorn nuts, secure the servos and allow smooth mechanical motion. The design is modular and sturdy, with pivoting rubberized feet to stabilize the base on uneven surfaces. Builders should take care not to overtighten screws during assembly, as this can restrict movement or cause stress on the servo mounts.
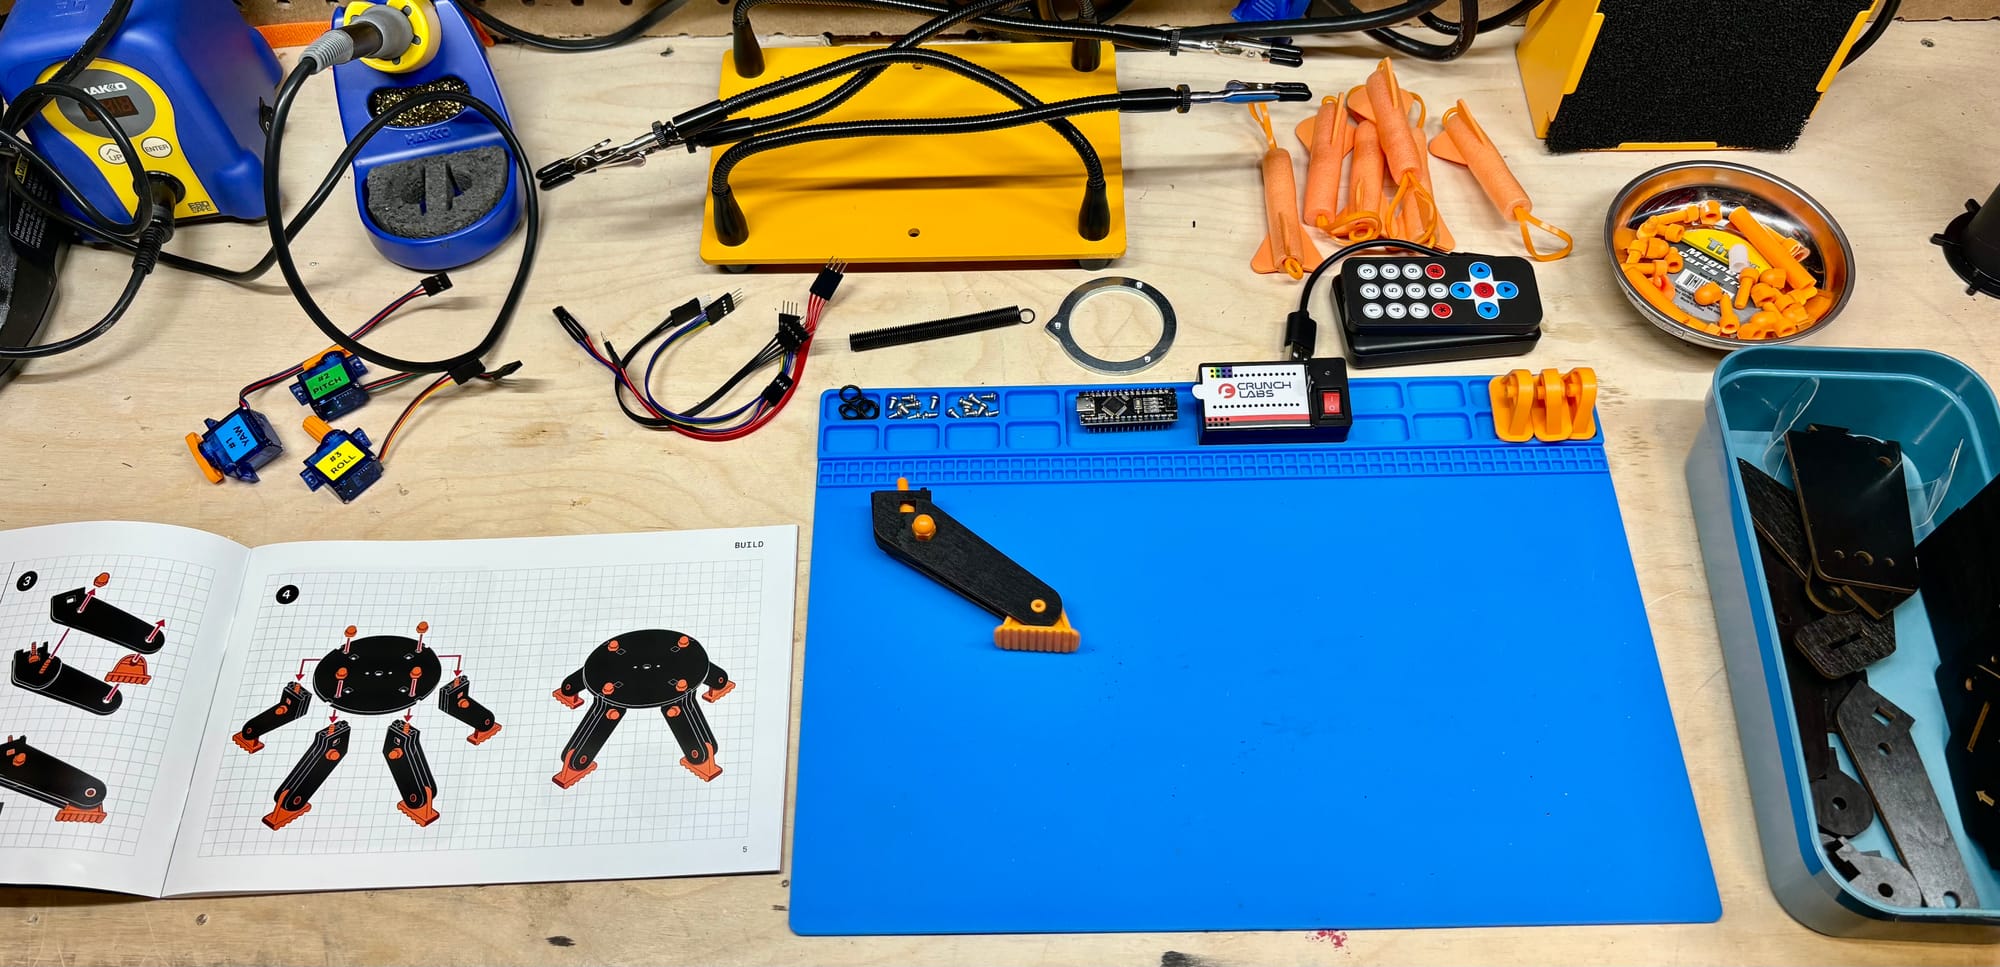
As previously mentioned, The turret uses three servo motors. A continuous rotation servo is mounted at the base and controls left-right rotation. A second continuous servo is attached to the firing arm and is responsible for pulling back and releasing the magnetic launcher. The positional servo, mounted behind the barrel, adjusts vertical aim by tilting the launcher up and down. The installation direction of this servo is critical. Because it is designed to hold specific angles, inverting the orientation will cause it to move incorrectly. This can result in sudden, forceful motion that may damage the turret or misalign components.
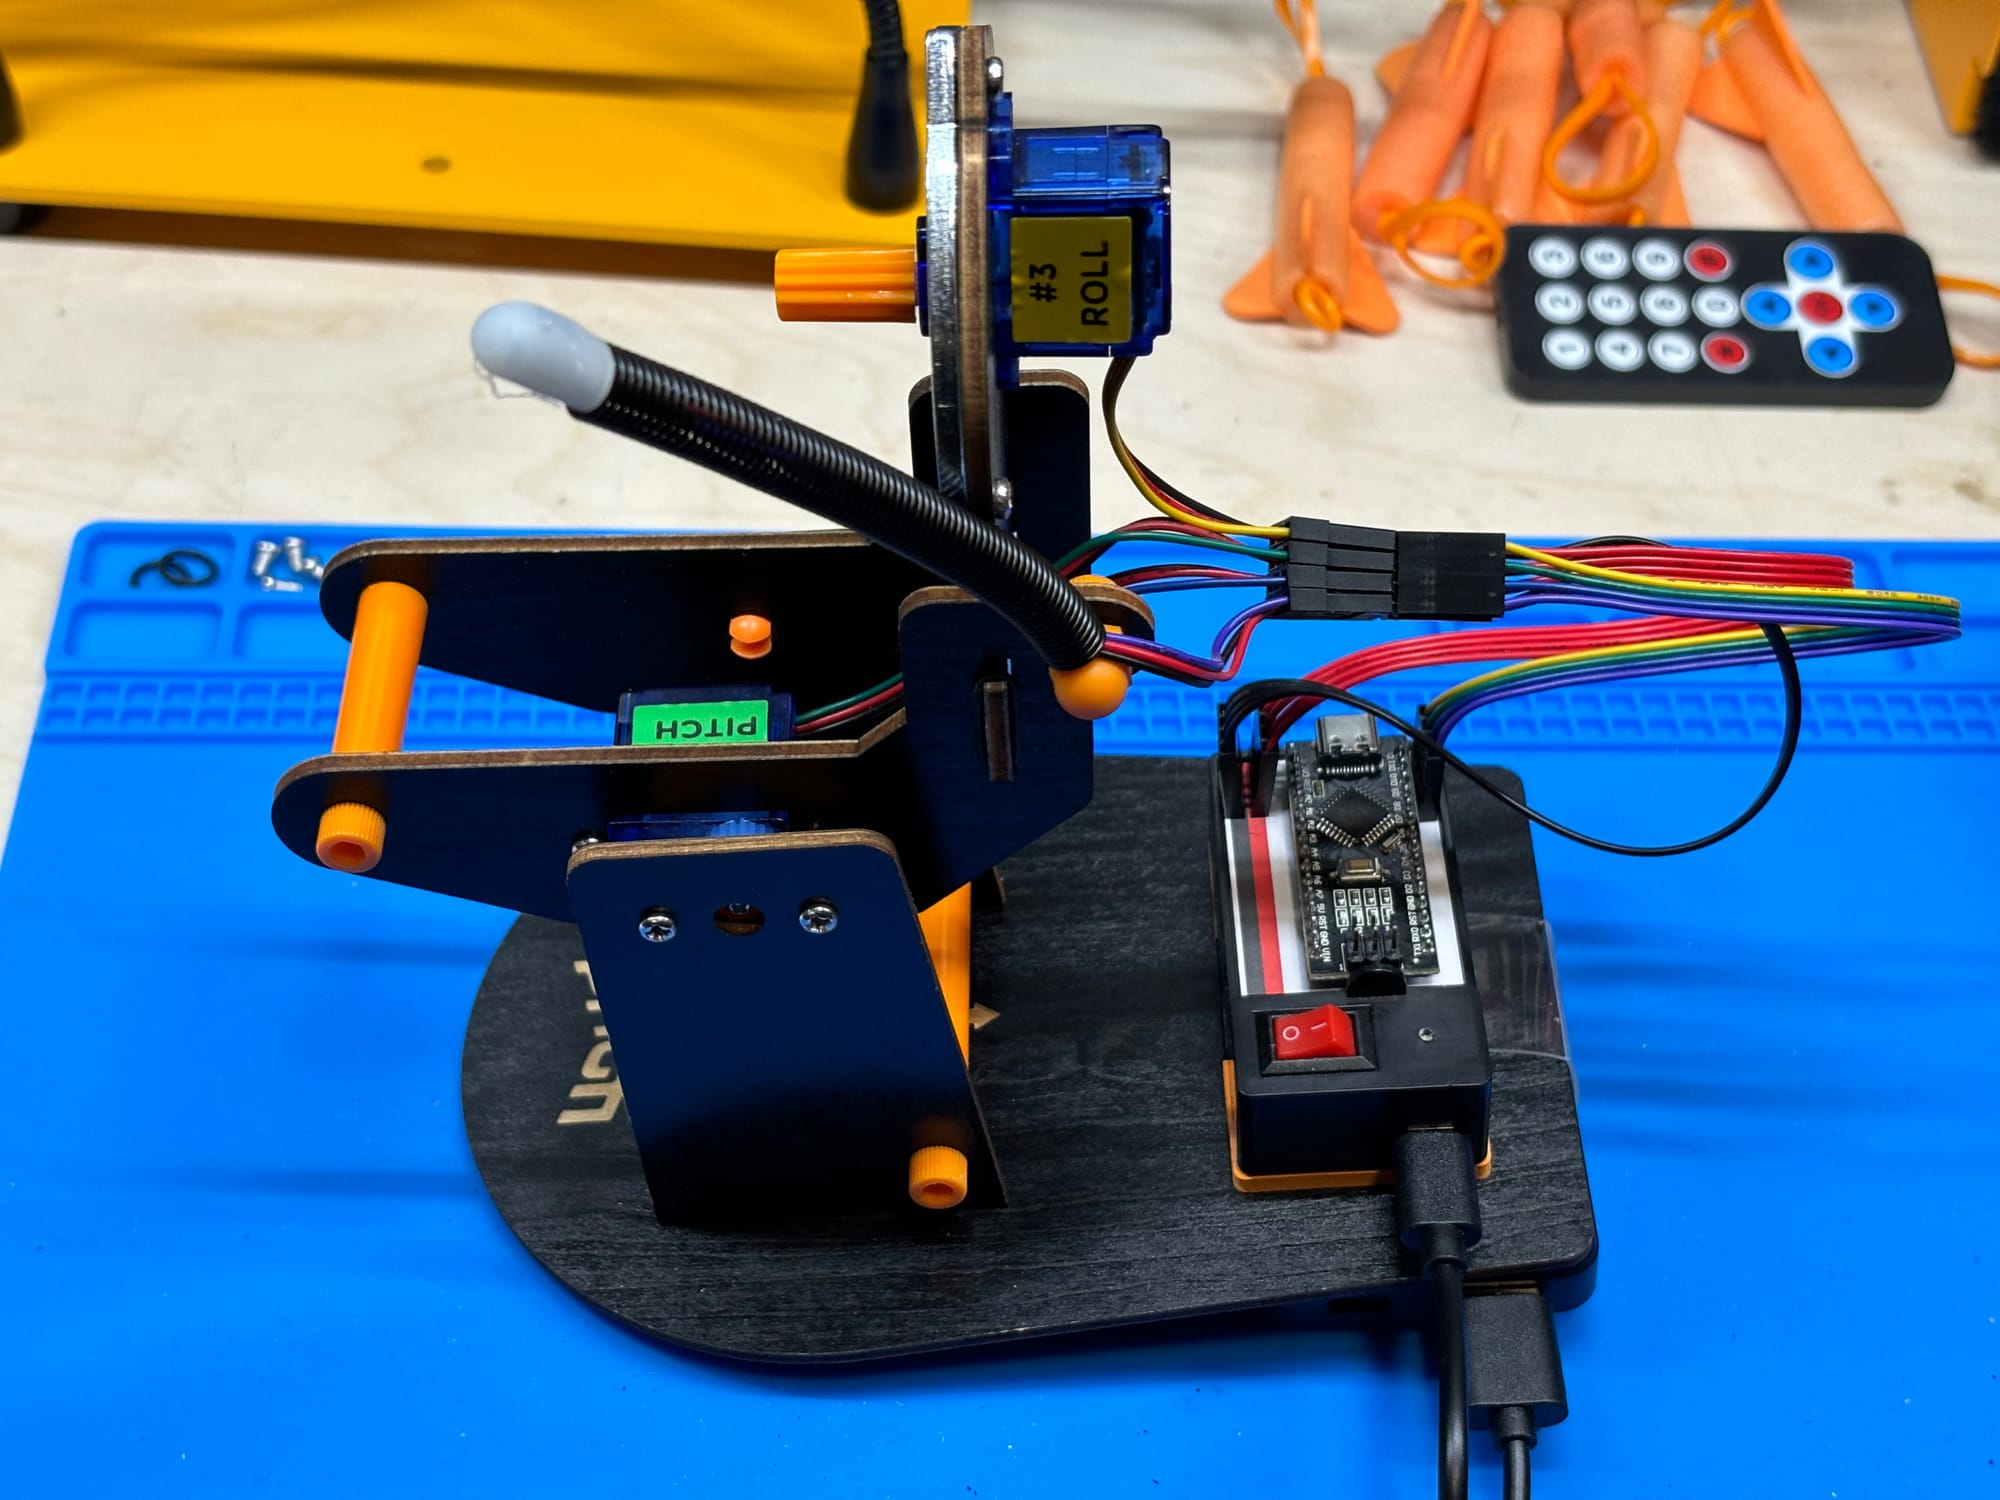
Electronics are added midway through the build. A small breadboard connects the servos, IR receiver, and power lines to a Nano-compatible microcontroller. All connections use jumper wires. The IR receiver is mounted at the front of the turret and listens for invisible pulses of light from the included remote. When a button is pressed, the receiver detects the signal, and the microcontroller responds by activating one or more servos. Cables should be neatly routed and tucked out of the way to prevent tangling or tension during movement.
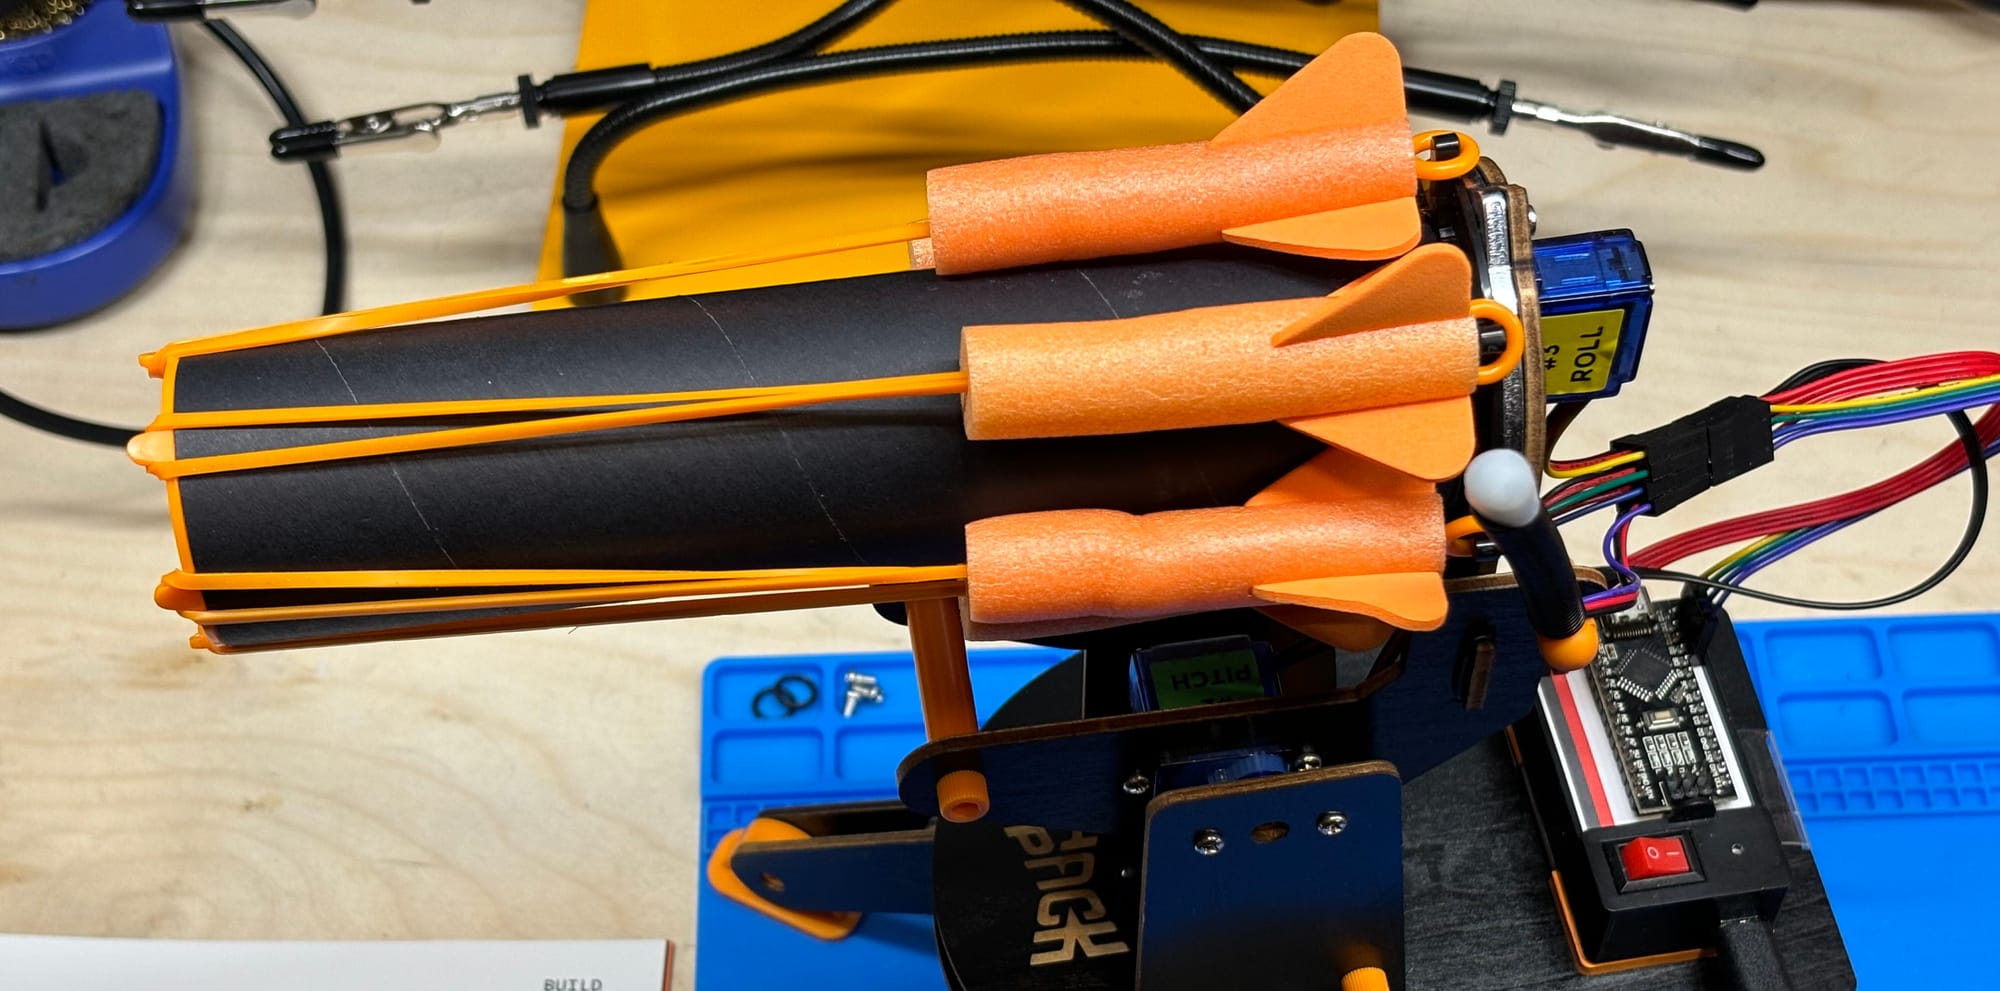
The firing system uses a magnetic barrel and foam darts tipped with a silicone elastic. Each dart is loaded by stretching the elastic and hooking it onto a small nub near the edge of the rotating barrel. As the barrel turns, it reaches a fixed metal peg that pushes the elastic off the nub. This sudden release propels the dart forward. The design is simple and reliable, with few moving parts and little risk of jamming.
Once fully assembled, the turret operates immediately using the code preloaded onto the Nano-compatible board. No additional programming is required to begin. The remote can be used to test movement, aim, and firing one step at a time, allowing builders to verify that the turret behaves as expected.
Getting Started with Code
One of the strongest features of the Hack Pack series is the web-based IDE (integrated development environment). Rather than requiring builders to install tools or configure drivers, CrunchLabs provides a browser-based interface that makes it easy to view, edit, and experiment with the turret's code. The interface includes an AI-powered assistant that can answer coding questions, making it easier for beginners to troubleshoot or understand how specific commands work.
The turret is powered by a Nano-compatible board with a USB-C port. Builders must connect it directly to a computer via USB-C to upload or modify the code.
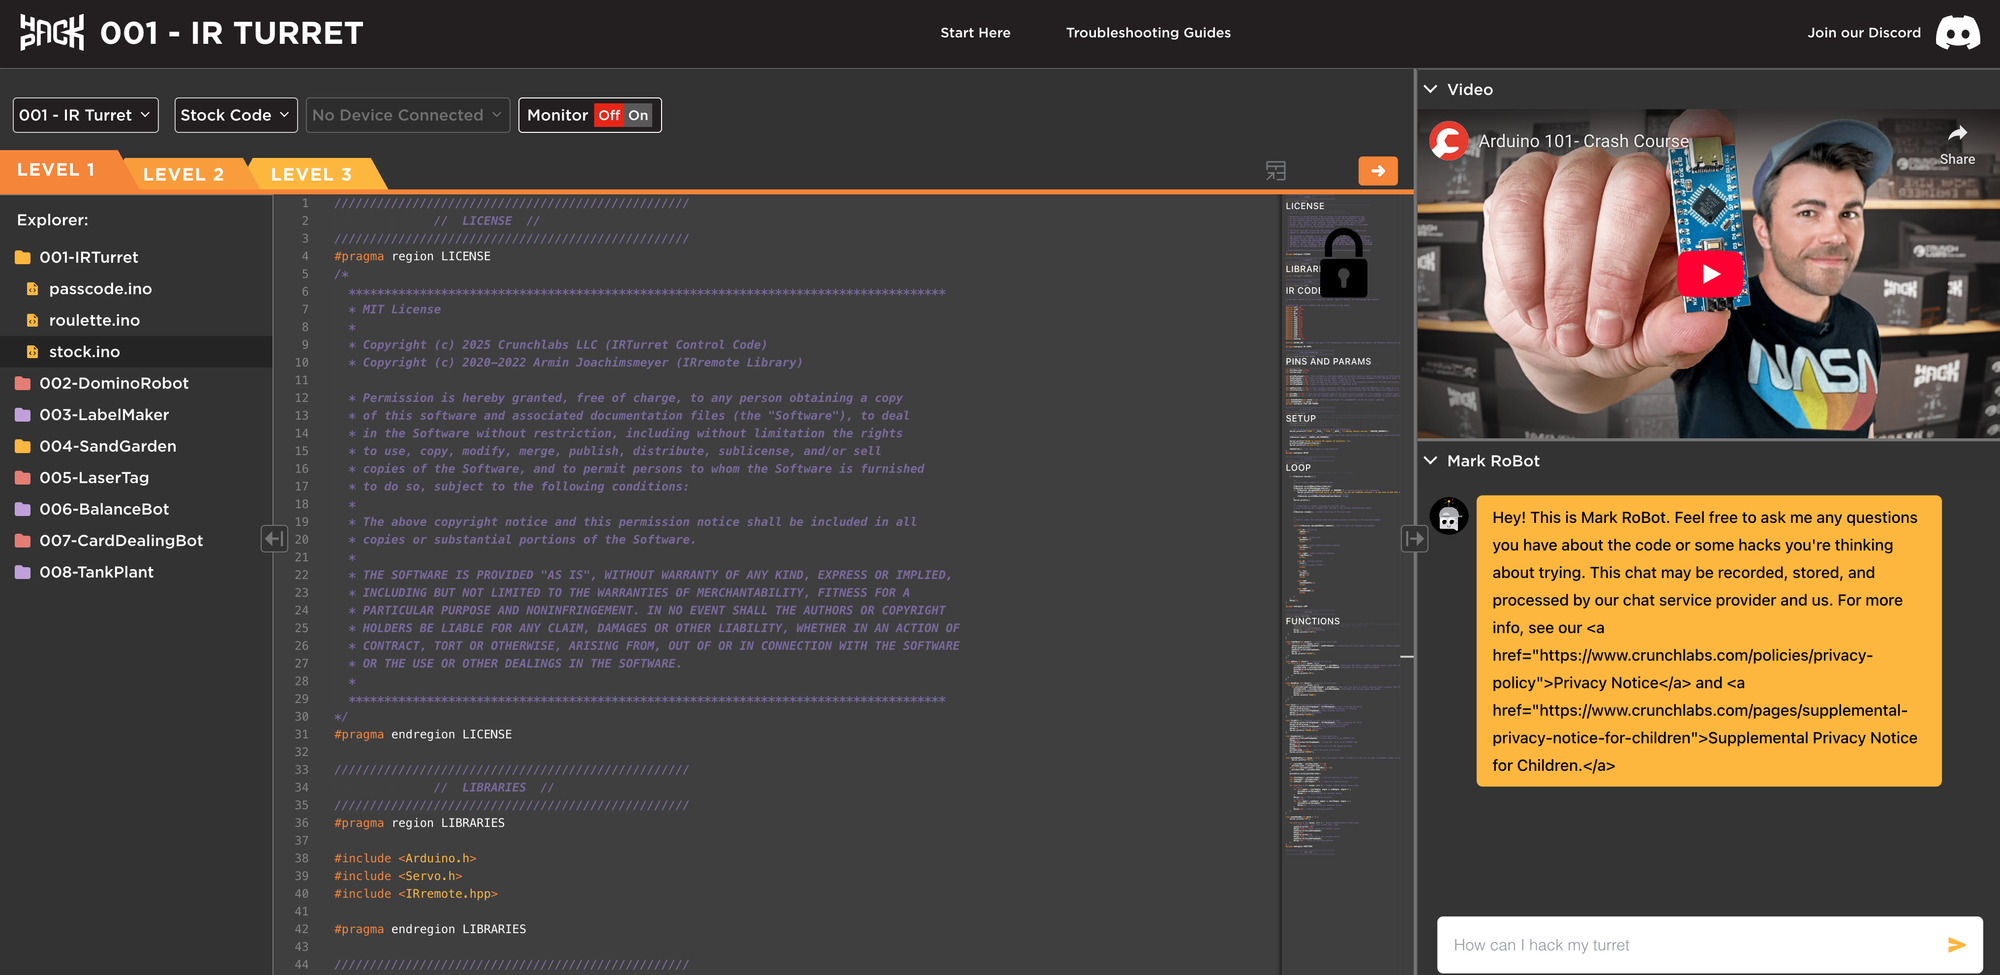
The IDE includes three access levels to help ease builders into the process:
- Level 1 is read-only. Builders can view the full source code, explore how the turret works, and learn by reading comments and logic without risk of changing anything by mistake.
- Level 2 unlocks specific variables. Builders can change values such as speed, angle, or delay to customize how the turret behaves, without needing to understand every line of code.
- Level 3 provides full access. Builders can modify any part of the program or even replace it entirely. This level is best suited for those ready to experiment, test new ideas, or write their own features from scratch.
Each Hack Pack project includes a few optional code variations. For the IR turret, one variation allows the turret to activate only after a specific sequence of remote buttons is entered, acting like a PIN code. These examples help teach conditionals, logic flow, and user input in a playful, hands-on way.
switch(IrReceiver.decodedIRData.command){

  case up: //pitch up
    upMove(1);
    break;

  case down: //pitch down
    downMove(1);
    break;

  case left: //fast counterclockwise rotation
    leftMove(1);
    break;

  case right: //fast clockwise rotation
    rightMove(1);
    break;

  case ok: //firing routine
    fire();
    break;

  case star:
    fireAll();
    delay(50);
    break;
}
The default behaviour of the IR Turret is controlled by this switch statement.
Behind the scenes, the code runs on an ESP32 Arduino compatible board. This means it follows standard Arduino syntax and libraries. For advanced users, the codebase is available on GitHub, and some community members have set up local development environments using the Arduino IDE or Visual Studio Code. Since the board is essentially an Arduino clone, it’s easy to port the project into more advanced workflows or other platforms without starting over.
void rightMove(int moves){ // function to move right
  for (int i = 0; i < moves; i++){
      //subtracting the servo speed = 0 (full clockwise rotation speed)
      yawServo.write(yawStopSpeed - yawMoveSpeed);
      delay(yawPrecision);
      yawServo.write(yawStopSpeed);
      delay(5);
      Serial.println("RIGHT");
  }
}

void upMove(int moves){ // function to tilt up
  for (int i = 0; i < moves; i++){
        if((pitchServoVal+pitchMoveSpeed) < pitchMax){
        //increment the current angle and update
        pitchServoVal = pitchServoVal + pitchMoveSpeed;
        pitchServo.write(pitchServoVal);
        delay(50);
        Serial.println("UP");
      }
  }
}
Controlling positional and continuous servos is different in code.
The stock code for the IR turret is built around a simple event loop. It begins by initializing the IR receiver and moving the servos to a home position. Inside the main loop, the code listens for infrared signals and decodes them using the IRremote library. Each recognized signal is matched to a command using a switch statement, which calls the appropriate function such as upMove(), rightMove(), or fire(). These functions directly control the servos by writing speed or angle values, depending on the type of servo involved. All variables and constants, including pin mappings and speed values, are clearly defined at the top of the file, making it easy to adjust hardware behavior. After each action, the IR receiver is reset so it can capture the next input without interruption.
Beyond the Build
Once the IR turret is fully assembled and functional, it becomes a solid platform for experimentation. The combination of servos, a programmable microcontroller, and remote input makes it easy to test new ideas without starting from scratch. For builders comfortable with code, one of the simplest extensions is to remap the remote control inputs or add new commands. One variant, called Roulette, programs the turret to spin and pause periodically, simulating a roll of a six-sided die at each stop. The turret only fires if the random roll meets a certain condition, introducing chance into the firing logic and turning the system into an interactive game mechanic.
Hardware can also be modified. Some builders have added sensors like ultrasonic rangefinders to create a “sentry mode,” where the turret scans until movement is detected. These changes also require basic code modifications but open the door to more advanced interaction models.
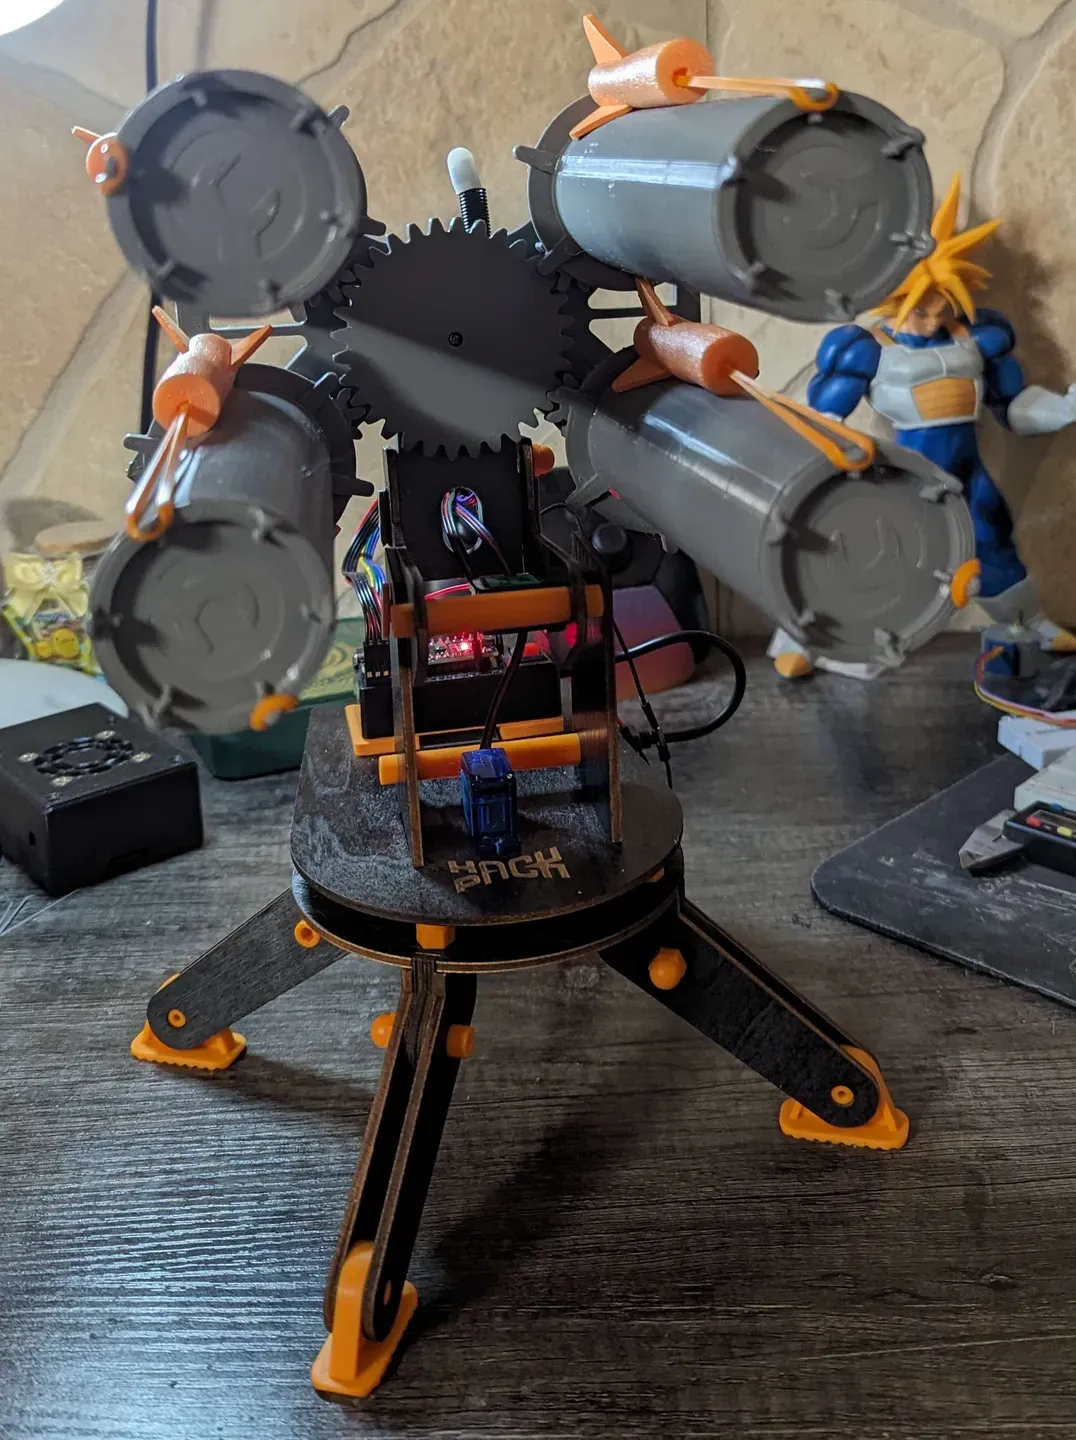
Customization extends to the physical design as well. Since the frame is made of wood and plastic, it can be rebuilt, painted, or replaced with 3D-printed parts. One example is this quad barrel design, as found on Printable. CrunchLabs supports these creative directions and encourages users to share their builds and badge achievements on the project’s website.
For those ready to go further, resourceful coders have pushed the source code on GitHub. The firmware can be edited in the Arduino IDE or more advanced tools like Visual Studio Code. Uploading custom versions is straightforward, and the structure of the original code makes it easy to understand and expand. Whether changing how the turret fires or creating an entirely new game mechanic, the project offers a fun and flexible environment for embedded experimentation.
Final Thoughts
The IR turret is an invitation to learn. It teaches fundamental concepts in electronics, mechanical control, and embedded programming, all through a clear and well-paced experience. The wooden structure is sturdy and satisfying to assemble, and the preloaded firmware removes common setup barriers that often discourage beginners.
What makes this project stand out is how approachable it feels. Builders are not just handed instruction, they are given tools and encouragement to explore. The code is readable and well organized, the hardware is reliable, and the community examples show what is possible beyond the default configuration. Whether someone is just starting out with Arduino or looking for a fun way to sharpen their prototyping skills, the IR turret is a strong first step into the Hack Pack ecosystem.